Winterlicious Tutorial FTU
I created this tutorial on November 15, 2008. If this tutorial resembles any other tutorial it's by accident this was created completely from my mind and knowledge of psp. It was created in PSP X but should work for any version.
Supplies you will need:
Tube of choice:
I'm using the beautiful artwork of Suzanne Woolcott. You must have a license to use her artwork. You can purchase one here. Do Not Use Unless You Have The Proper License To Do So!
Scrapkit of choice or the scrapkit I used called Winterlicious which you can download here.
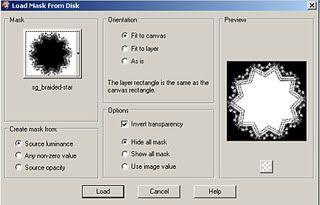
Mask is called sg_braided star. You can download it from essexgirl. Go here then go to masks and it's under her masks page 26.
Font of choice.
Let's Begin
Open a new canvas 600x600 flood fill white. We will crop and resize later. Add a new raster layer go to selections and select all. Open paper 8 or your choice from the scrapkit. Paste the paper into selection. Select none. Go to layers and down to load/save mask and find your mask. Apply using my settings.
Merge mask group. Open frame 2 resize 80% smartsize. Copy and paste as a new layer on your top of your mask go to image free rotate and use my settings.
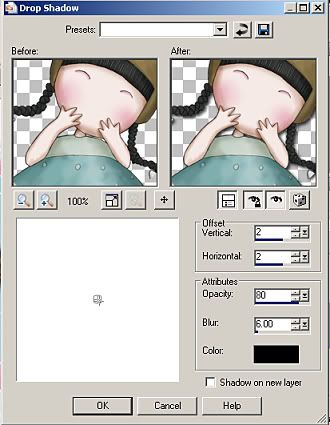
Grab your magic wand and click in the center of your frame go to selections, modify expand by 5. Open paper 4 or your choice. Paste as a new layer then go to selections invert and hit delete on your keyboard. Don't deselect, move your paper layer under frame. Now open the tube you want to use and paste as a new layer under your frame and resize if needed. Position your tube how you like and then hit delete on your keyboard. Now dropshadow your tube with my settings ( we will use the same settings throughout the tutorial).
Open the snowman from the kit and resize 50% smartsize place inside the frame and position how you want it make sure your snowman is under your tube also. Now dropshadow your snowman and your frame.
Open bow 3 or your choice resize 80% and paste as a new layer. Position at the bottom of your frame see my tag for reference. Dropshadow your bow.
Open the mittens from the kit resize 50% and paste as a new layer move to the top left side of your frame and dropshadow. Open button 2 or your choice from the kit and resize 50% and then repeat resize. Move up over the mitten strings and dropshadow.
Open flower 1 resize 50% then resize 80% place on the top right side of your frame see my tag for reference. Dropshadow your flower. Open flower 2 resize 50% then resize 80% 2 times. Place by the other flower and dropshadow.
Add your proper copyrights and license numbers.
Time for your text I used Wedding Invitation 2 font. Set your foreground to #75c6dc and your background to paper 9. Type out your text then convert to raster layer. Dropshadow.
That's it your done.
Hope you enjoyed this tutorial. Would love to see your results.


No comments:
Post a Comment