Santa's Workshop Tutorial FTU
This tutorial was written by me on November 18th, 2008. Any resemblance to another tutorial is purely coincidental. I created this tutorial using Paint Shop Pro X but should be able to be done in any version.
Supplies:
I'm using the beautiful artwork of Suzanne Woolcott. You must own a license to use her artwork. To purchase her artwork and a license then visit here.
My Supplies here.
I'm using a wonderful scrapkit from Kittz Kreations called Santa's Workshop she posted it on her blog on Oct. 12th and you can download it at her blog here.
The mask I'm using can be found at essex girl and it's under her masks on page 26. it's called Sg_Christmas 10. Go here.
The winter scene in my tag is from Rainbow Coffi and you can find her stuff here. You must register but it's free to register.
Let's Begin:
Open a new canvas 600x600 and flood fill white. We will crop and resize later.
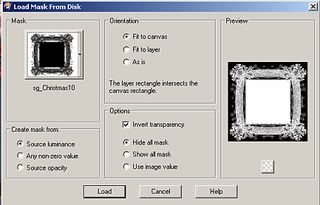
Open paper 2 copy and paste as a new layer onto your canvas. Go to layers down to load/save mask and find your mask and apply with my settings.
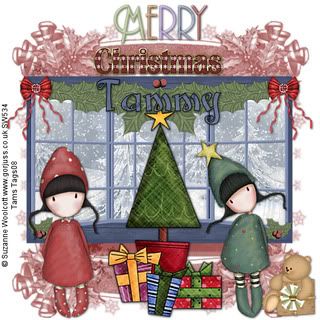
Merge group. Open the window that is in my supplies. Copy and paste as a new layer. Use your selection tube to draw a rectangle around your window panes. Add a new layer and flood with white (this is so your red mask doesn't show through your winter scene.) Move this layer below your window layer now find the winter scene mist you want to use and copy and paste it as a new layer. If your using the Rainbow coffi winter scene that I used then resize it 110% then go to selections invert and hit delete on your keyboard. Select none and then merge down your winter scene onto your white fill layer.
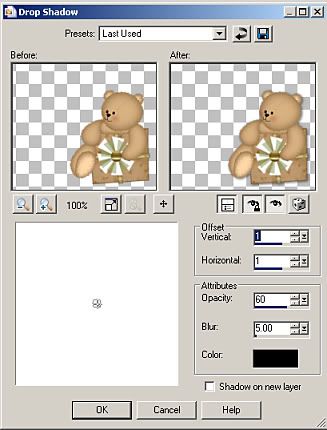
Open party bow2 from the kit resize the bow 50% then repeat the resize. Paste as a new layer on your tag and move up to the left top corner of your window. Sharpen the bow then duplicate it and go to image mirror it and place it on the top right corner of your window. Dropshadow your window and both the bows. Use my settings below.
Open Christmas tree with gifts. Resize 50% and paste as a new layer. Position the tree where you think it looks best. Dropshadow the tree with the same settings.
Open the tubes you want to use and resize if needed. Position them on your tag where you think they look best. Dropshadow your tubes.
Add any other embellishments that you would like and make sure to dropshadow.
Open the Christmas wordart and select the one you want to use resize 50% and then resize 80% two times. Sharpen and place at the top of your tag. Dropshadow your wordart.
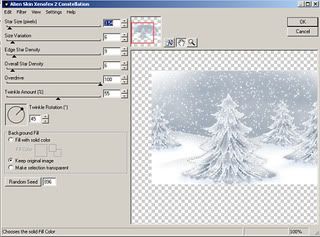
Now click on your winter scene layer and highlight it. Go to effects and down to your plugins and find your xenofex 2 constellation. Use my settings below.
Resize your tag.
Now add your proper copyrights for you tubes and license number if needed.
Set your foreground color to black and your background color to pattern and find paper 4. Make sure you have paper 4 open and minimized on your workspace. I provided the font I used for my tag in the supplies so open it up or use another font. Type out your text convert to raster layer. Dropshadow your text.
Save your tag as a Jpeg and your done.
Hope you have enjoyed this tutorial.


No comments:
Post a Comment