Forbidden Kiss

FORBIDDEN KISS
This tutorial was created by myself on Jan. 28th, 2008.
Any resemblance to another tutorial is coincidental.
The artwork I'm using is ©Marco Guaglione. You can purchase his artwork HERE.
Check out his awesome work here.
Supplies needed:
A tube of choice
Font I'm using Dyspepsia
Mask_teresa
Filters:
Eye Candy 4000 Gradient Glow
DSB Flux Bright Noise
Animation Shop
My Supplies HERE
Lets begin
Put your mask in your masks folder in PSP. Open your font and minimize.
Open a new canvas 600X600 transparent. Flood fill with white. Add a new raster layer. Flood fill this layer with #638BD2 or a color from the tube your using.Go to Layers, down to Load/Save mask, Load mask from disk. Find your mask_teresa. Use my settings.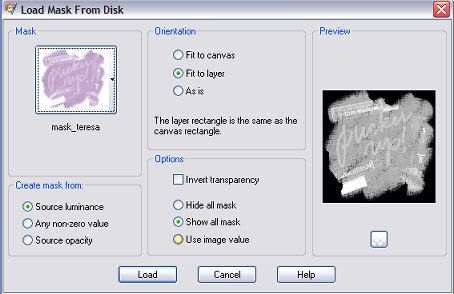
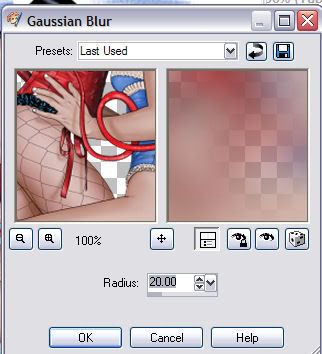
Click ok. Over on your layer pallet right click on your mask layer and then delete. Click yes when prompted. Then merge group. Copy your tube and paste as a new layer above your mask layer. Duplicate your tube. Close the copy of your tube. Click on your original tube layer. Resize your original tube by 110%. Now go to Adjust down to Blur, Gaussian blur. Radius set to 20.00. See screenshot.
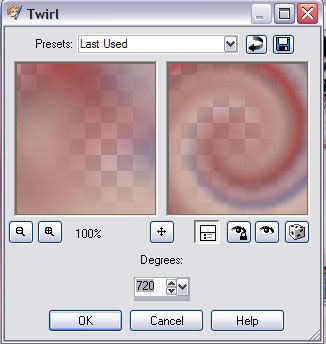
Still on your original tube layer go to Effect, down to Distortion Effects and click on twirl. Set degrees to 720. See screenshot.
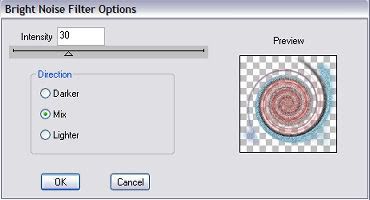
Repeat the twirl with the same settings. Now duplicate your twirl layer two times so you have a total of three twirl layers. Rename the Twirl 1, Twirl 2, Twirl 3. Close off your twirl layers 2 and 3. Click on twirl layer 1 to make it the active layer. Go to Effects down to Plugins and find your plugin DSB Flux Bright Noise. Make sure Mix is checked and set intensity to 30. See screenshot.
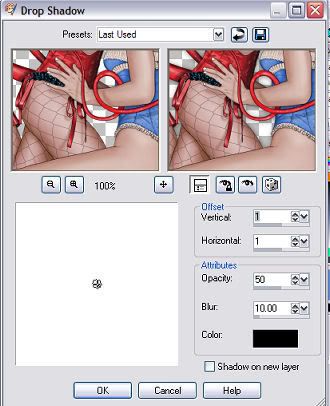
Click ok. Close your twirl 1 layer and then click on twirl 2 layer and unhide it. Go back to DSB Flux bright noise and use same settings except for click on mix two times. Close off twirl 2 layer and click on twirl 3 layer and unhide. Go back to DSB Flux bright noise and use same settings except for click on mix three times. Now unhide your copy of your tube. It should be the top layer in your layer pallet. Add a dropshadow to your tube. See screenshot.
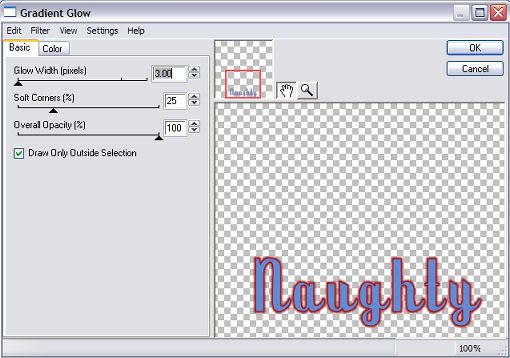
Time to add your text. Set your foreground color to #A0181F or a color from the tube your using. Set your background color to #638BD2 or choose another color from the tube your using. Click on your text tool and find your font, Size 72, stroke width 1.0. Type out your text and position where you think it looks best. Convert your text to raster layer. Now go to Effect, down to your plugins and find Eye Candy 4000 Gradient Glow. Use settings in screenshot.
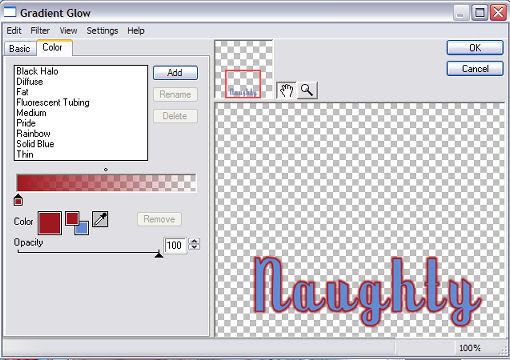
Under the color tab click medium and use your foreground color. See screenshot.
Click Ok. Add your proper copyrights and your watermark.
Time to Animate.
Make sure your twirl layers 2 and 3 or hidden. Twirl 1 layer should be showing. Copy merge and open animation shop paste in animation shop as a new animation. Back in PSP hide twirl 1 layer. Unhide twirl 2 layer. Copy merge and paste after current frame in animation shop. Back in PSP hide twirl 2 layer and unhide twirl 3 layer. Copy merge and paste after current frame in animation shop.
View your animation and if you like resize and save as a gif.
I hope you have liked this tutorial.


No comments:
Post a Comment