Teen Spirit

TEEN SPIRIT TAG
I'm using the Awesome artwork of CEI. You must have a license to use this artwork. You can purchase a license HERE.
Check out more awesome artwork here.
Supplies
Tube of choice
Scrap kit I'm using TeenSpirit by Yvette from Misfits Scrapz you can download it HERE.
Font of choice. I'm using Teen Spirit
Filters
VM Distortion Kaleidscope
DBS Flux Bright Noise
Lets Begin
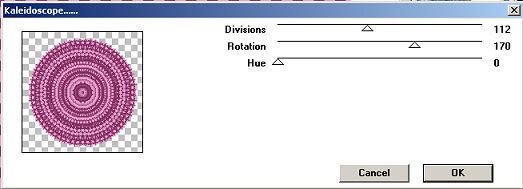
Open a new canvas 600x600 transparent. Flood fill white. Open paper 2 from the scrap kit. Resize 80%. Copy and paste as a new layer. Go to Effect down to your Plugins and find VM Distortion. Use Kaleidscope. See screenshot for settings.
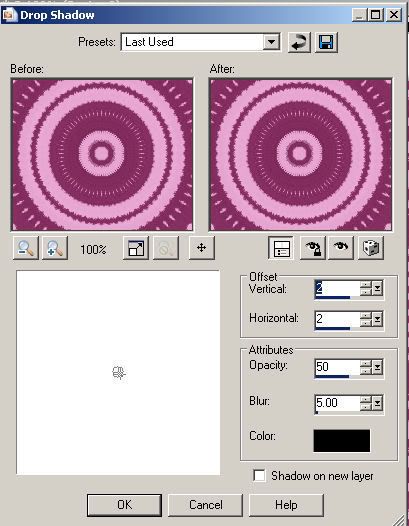
Now we are going to dropshadow the circle we just made. See both screen shots for dropshadow settings.
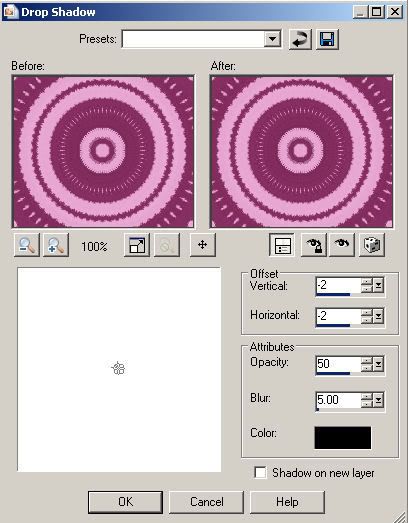
Repeat dropshadow with the settings in screenshot below.
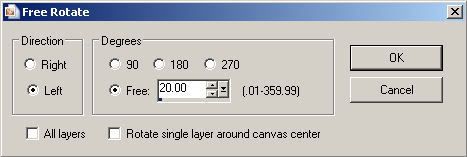
Open pocket 2 and resize 80% repeat resize. Copy and paste as a new layer. Now rotate your pocket with these settings.
Dropshadow your pocket. Open Flower 3 resize 50%. Copy and paste as a new layer and place it so it looks like it's poking out of the pocket. Open Flower 4 resize 50%. Copy and paste as a new layer and place beside your flower 3. Dropshadow both flowers.
Open butterfly 1 resize 50%. Paste as a new layer and place where you like. Dropshadow.
Open Heart 1 resize 50%. Copy and paste as a new layer. Place at the bottom of the pocket see my tag for example. Dropshadow. Open heart 2 resize 50%. Copy and paste as a new layer. Place beside your other heart. Dropshadow. Open your music notes and resize both of them 50%. Copy and paste as new layers and place where you like them. Dropshadow. Close all your layers except for your music notes and your two heart layers. Go to Layers Merge and Merge visible. Duplicate your merged layer two times. So you have 3 layers. Now click on your original merged layer. Go to Effects DBS Flux bright noise. Use my settings.
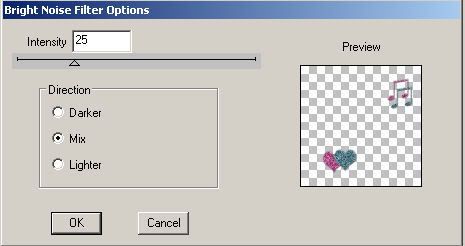
Close off this layer and click on your next layer. Apply bright noise but click on mix two times. Close this layer. Now click on your third layer and apply bright noise but click mix three times.
Open the tube you want to use and copy paste as a new layer resize your tube if it's too big. Place where you like. Dropshadow.
Set your foreground color on black. Set your background color on #842E60. Find your font. Size 72 stroke width 1.0. Type out your text and convert to raster layer. Place where you think it looks good. Dropshadow. Add your proper copyrights and your watermark.
Time to Animate
Make sure your two copies of your merged layer are closed off. Then copy merge your tag and paste as a new animation in animation shop. Back in psp close of your original merged layer and open the second one. Copy merge your tag. Back in animation paste after current frame. Back in psp close your second layer of your merged layer and open the third layer. Copy merge your tag. Paste after current frame in animation shop. Resize your tag 80%. Click on view animation if happy with your tag save as a gif.
I hope you have enjoyed this tutorial.


No comments:
Post a Comment