I Love My Mom

I LOVE MY MOM
I created this tutorial on May 5th, 2008. If this tutorial has a resemblance to another tutorial is coincidental.
Supplies:
Happy_Mothers_Day Scrapkit which is the beautiful work of CSD Tutorials & Scraps you can purchase it here.
Or use a scrapkit of your choice.
Tube of choice.
I'm using The beautiful artwork of Jennifer Janesko. You must have a license to use her artwork you can purchase one here.
Check out more of her awesome artwork here.
Font of choice.
Lets Begin.
Open a new canvas 600X600 transparent. Flood fill white. Open paper 9 and resize 80% smartsize. Repeat the resize. Copy paper and paste on working canvas. Dropshadow your paper. See screenshot for settings.
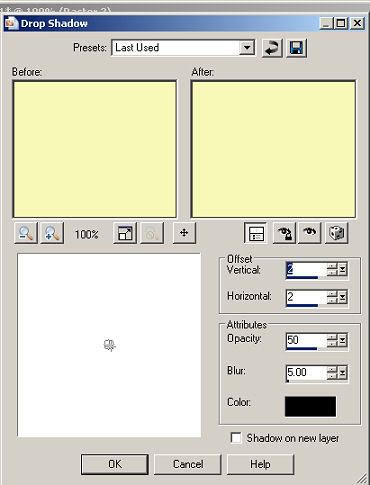
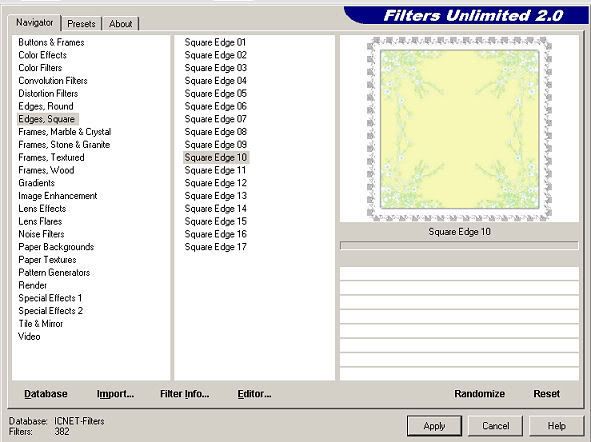
Repeat dropshadow same settings EXCEPT change Vertical and Horizontal offset to -2. Go to Effects down to your Plugins and find your Filters Unlimited 2.0. See screenshot for settings.
Click on apply. This gives it a lace looking border. Dropshadow with same settings as before V& H 2 and then again with -2. Open frame 1. Copy and paste as a new layer. resize by 80% smartsize. Click on your magic wand tool with your settings at Add, RGB Value, Tolerance 20, Feather 0, Anti alias checked. Now click in the middle of two of the frames I chose the top right frame and the bottom left frame. Go to Selections, down to Modify, click on Expand and expand by 3. Open paper 6, copy and paste as a new layer. Go to selections down to Invert. Make sure your paper 6 layer is highlighted in your layer pallet and then hit delete on your keyboard. Go to Selections, Select none. Move this layer below your frame layer in the layer pallet. Now click on your frame layer and make it the active layer. Click in the middle of the remaining two frames with your magic wand. Go to Selections down to Modify and expand by 3. Open paper 5 copy and paste as a new layer on your working canvas. Make sure your on paper 5 layer in your layer pallet then go to Selections Invert. Hit delete on your keyboard. Go to selections Select none. Move this layer below your frame layer.
Now we are going to add your tubes. Take your magic wand and click inside one of the frames. Expand by 3. Copy and paste your tube as a new layer. Resize your tube if it's to big. Position your tube inside the frame the way you want it when happy with placement selections invert. Hit delete on your keyboard. Move below your frame layer. Now add a dropshadow same settings before. Continue doing this until you have your tube in each frame. I also mirrored my tubes. Thats up to you.
Now hide your white background your paper 9 layer, and frame layer. Merge visible your tube layers and paper 6 & 5 layers. Unhide all your layers. Click on your frame layer to make it active and add a dropshadow. Repeat dropshadow with -2.
Open one of the doodles from the scrapkit. Copy and paste as a new layer, make sure it's just above your paper 9 layer. Dropshadow with same settings. Duplicate your doodle layer then go to Image, down to Mirror. See my tag for placement of your doodles.
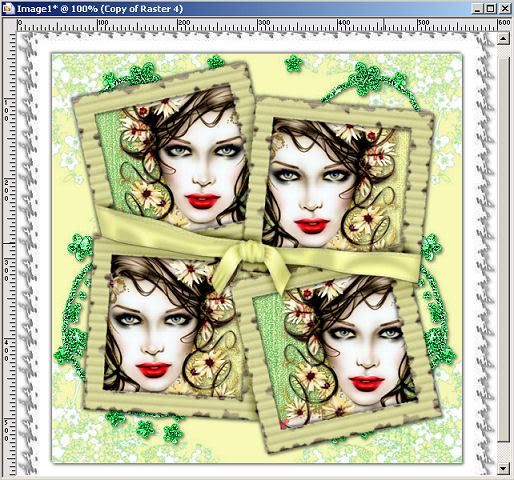
You should now have this so far.
Open flower 6 and resize by 50% smartsize. Then resize 60% smartsize. Copy and Paste as a new layer. Position toward bottom left side of tag. See my tag for example. Dropshadow. Duplicate your flower layer and position like in my tag. Open flower 5 resize by 50% smartsize repeat resize. Copy and paste as a new layer and position like I have. Dropshadow.
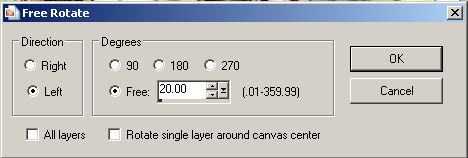
Open one of the tags from the scrapkit. Resize 50% smartsize. Copy and paste as new layer and position it down by the flowers move this layer under the flower layers and make position the end of the tag just behind the flowers. Choose a bow from the scrapkit and open in PSP. You will want to use your Lasso tool set to point to point. Go around the bow you want. Then copy and paste as a new layer. Resize bow 50%. Go to Image Free Rotate and use my settings in the screenshot.
Dropshadow. Move your bow to the top left corner of frame see my tag for example. Duplicate your bow and move to bottom right corner of frame.
Open the butterflies. Choose the one you want to use and use the lasso tool. Copy and paste as new layer. Resize 50%. Position at top right corner of frame see my tag for example. Dropshadow.
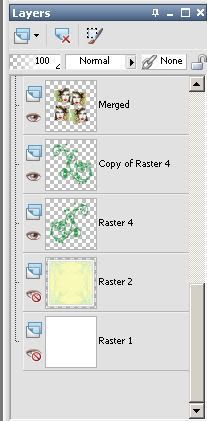
Close off the the white background and paper 9 layers. Here is how your layers should look in your layer pallet.
Merge visible the rest of your layers. Resize your merged layer by 85%.
Time to add your text. Choose your font size 48-72 your perference. Stroke width 2.0. Set your foreground to #B0E0A5, and your background to #F7F8B6. Type out your text and convert to a raster layer. Dropshadow.
Add your correct copyrights and your watermark. Resize if you like. You are done.
I hope you have enjoyed this tutorial.


No comments:
Post a Comment