Thanksgiving Blessings Tut FTU
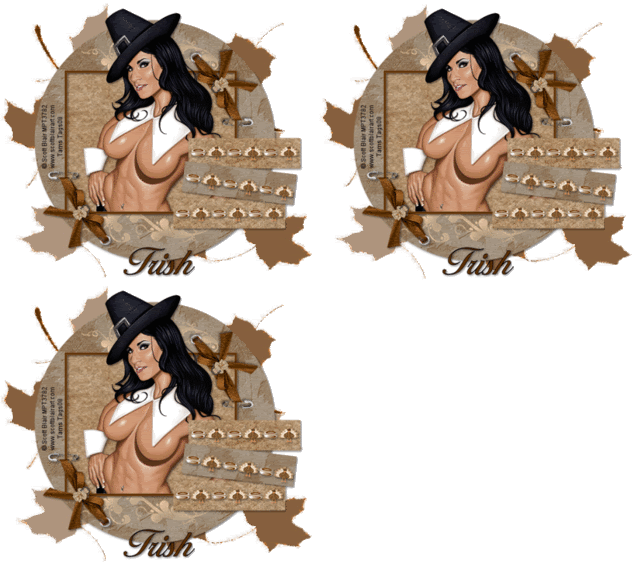
Thanksgiving Blessings this tutorial was created by me on November 13, 2008. If this tutorial resembles another tutorial its by accident. This tutorial was created from my own ideas and things I have learned using PSP. This tutorial was done in PSP X but should be able to be done in any version.
Supplies you will need:
Tube of choice I'm using the fantastic artwork of Scott Blair and you must have a license to use his artwork. Do Not Use The Same Tube Unless You Have The Proper License To Do So. You can purchase a license here.
Thanksgiving Blessings scrapkit which you can download at Trish's awesome blog dreamland designs here.
Missy's template 3 which you can download from her tutorial site Divine Intentionz under her links button. Here
My Supplies here.
Let's Begin
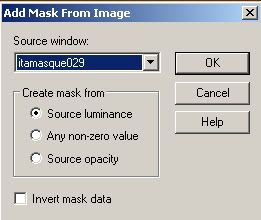
Open your template and hold down shift and D to duplicate your template. Delete the copyright layer. Close your original template. Click on your white background layer to highlight it. Then add a new raster layer, set your foreground color to #602d00 and flood fill your new raster layer. Open your mask that is in my supplies and minimize it on your workspace. Go to layers and new mask layer and use my settings below.
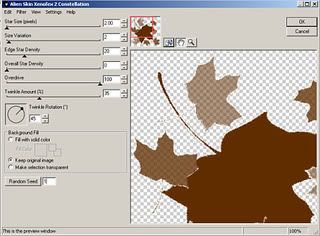
Delete your mask and click yes on the pop up window. Merge group. Duplicate your mask layer 2 times so you have a total of 3 mask layers. Close off your two duplicate mask layers and click on your original mask layer. Go to effects down to plugins and find your plugin Xenofex 2 Constellations and use my settings below.
Close off your original layer and open your next mask layer apply constellation to that layer but make sure to hit random seed once. Close off that layer and apply constellation to your 3rd mask layer but hit random seed one time on that layer also. Now go back to your original mask layer and choose your change to target brush and make sure your foreground color is still #602d00 and colorize your constellations with the target brush. Do this to all mask layers.
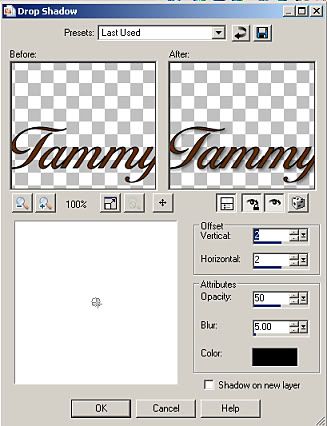
Now click on your circle layer and select all float, defloat, modify smooth both settings at 10. You should have your scrapkit open on your workspace. Find paper 2 and copy and paste it as a new layer onto your template. Go to selections and down to invert then hit delete on your keyboard. Now select none and delete your circle layer. Now dropshadow your circle with my settings below.
Now click on your frame layer select all float, defloat and flood fill with #602d00. Click on rectangle 3 and select all, float, defloat, modify smooth same settings as before. Paste paper 2 as a new layer selections invert hit delete on your keyboard. Delete your original rectangle layer and then dropshadow. Click on rectangle 1 selections select all, float, defloat, modify smooth same settings. Paste paper 2 selections invert delete on your keyboard. Delete your rectangle 1 original layer. Dropshadow your rectangle. Click on rectangle 2 selections select all, float, defloat, modify smooth. Copy and paste paper 4 as a new layer selections invert delete. Delete your original rectangle 2 layer and dropshadow.
Select your magic wand then click on your frame layer. Click in the center of your frame then selections modify expand and expand by 3. Paste paper 4 as a new layer selections invert delete. Select none, move your paper layer under your frame. Now find the tube you want to use. Copy and paste as a new layer resize if needed. Position your tube how you want it then erase the parts that hang below the bottom of the frame. Erase until it looks like the bottom of your tube is inside your frame and the top of your tube is coming out of the frame. Dropshadow your tube. Then dropshadow your frame.
Copy the turkey chain from the scrapkit and paste as a new layer, position on your rectangle and then use your selection tool to select the portions that are hanging over the rectangle and delete them. Do this to all 3 rectangles and position on the rectangles then dropshadow all 3 turkey chains.
Copy your indian girl safety pin ribbon from the scrapkit and paste as a new layer. Resize by 80% smartsize. Place in the lower left hand corner of your frame. Duplicate then go to image mirror and then flip. Position in the top right corner of the frame dropshadow both.
Add any other embelishments you would like. Don't forget to dropshadow them.
Now add your proper copyrights and license number.
Set your foreground color to black and your background color #602d00 stroke 1, text size 100 and type out your text. Convert to raster and then dropshadow.
Now to animate your tag.
Click on your original mask layer and make sure its open. Close off the other 2 mask layers. Copy merge and paste into animation shop. Back in psp close your first mask layer and open your second mask layer copy merge and paste after current frame in animation shop. Back in psp close your second mask layer and open your 3rd mask layer, copy merge and paste after current frame in animation shop. Resize your animation 85% and then save as a gif.
That's it your done. I hope you have enjoyed my tutorial.
Would love to see your results.


No comments:
Post a Comment