
Oh Happy Day Tutorial

This tutorial was created by myself on March 25th, 2011.
Supplies needed:
Scrap kit by wicked Princess Scraps called Oh Happy Day. You can download it HERE.
Tube of Choice. The one I'm using was a freebie from Lady Mishka when she was at Picsfordesign.com. If you like her artwork then you can buy her work at PSP Tubes Emporium
Font of choice. I used the font Beautiful ES. You can download it HERE.
Filter Mura Meister Copies
Eyecandy 4000 Gradient Glow
VM Extravaganza transmission
Let's begin.
Open a new transparent image 600x600.
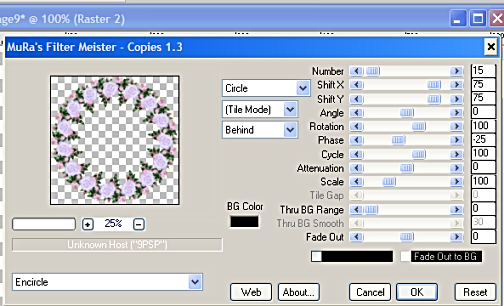
Open WP_OHD_RoseCluster. Paste on your working canvas. Resize 40% smart size. Go to effects Mura Meister Copies. See my screenshot for the settings I used.
I then resized my flowers by 90% smart size. I then sharpened my "frame". Duplicate your frame layer. On the bottom layer go to adjust blur gaussian blur radius 10.00. Still on the layer we just blurred go to VM Extravaganza transmission and apply with default settings.
Now highlight your top frame layer. Grab your magic wand and click in the middle of your frame and then modify expand by 8. Open paper of choice and paste as a new layer below your frame layer. I used paper 20. Invert and hit delete on your keyboard. Do not deselect.
Open WP_OHD_Dangle. paste as a new layer under your frame but above the paper layer. Position toward the top of your frame. Once happy with the position hit delete on your keyboard. Do not deselect.
The tube I used came with the bunny that I pasted in the center of my frame but the scrap kit has a cute bunny you could use or something else if you choose. Once you have your image in the center of the frame delete any that is hanging over the edges of the frame. Dropshadow your frame the dangle and your image you pasted in the center.
Now make sure your on your top layer and paste your main tube. Position where you think she looks best. Duplicate your tube and then adjust blur Gaussian blur radius 3.00 on your top duplicated tube. Go to blend mode and change the blend mode to soft light. Dropshadow your original tube.
Now here is where you can make the tag yours add any elements from the kit you like. Don't forget to dropshadow them. I just used the basket with eggs and positioned it so it looked like she was holding it.
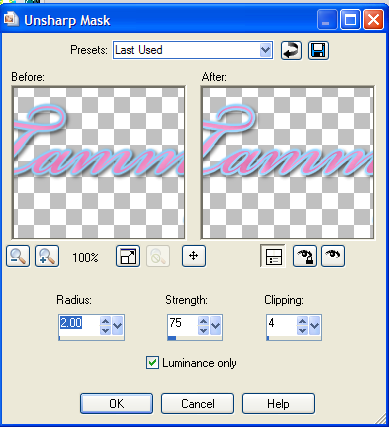
If you want to resize now is the time. After I resize I always sharpen each layer using unsharp mask with the settings below.
Add your copyright. Doing this after you resize keeps it from becoming blurry. Then I add my name. I used Paper 8 as the fill for my font.
I hope you enjoy this tutorial. I would love to see your results.


No comments:
Post a Comment