I moved all my tutorials from my free webs site here to my blog. Figured it would be easier to have them all in one place. Hope it makes it easier for everyone.
Friday, June 19, 2009
Santa's Workshop Tutorial FTU
Santa's Workshop Tutorial FTU

This tutorial was written by me on November 18th, 2008. Any resemblance to another tutorial is purely coincidental. I created this tutorial using Paint Shop Pro X but should be able to be done in any version.
Supplies:
I'm using the beautiful artwork of Suzanne Woolcott. You must own a license to use her artwork. To purchase her artwork and a license then visit here.
My Supplies here.
I'm using a wonderful scrapkit from Kittz Kreations called Santa's Workshop she posted it on her blog on Oct. 12th and you can download it at her blog here.
The mask I'm using can be found at essex girl and it's under her masks on page 26. it's called Sg_Christmas 10. Go here.
The winter scene in my tag is from Rainbow Coffi and you can find her stuff here. You must register but it's free to register.
Let's Begin:
Open a new canvas 600x600 and flood fill white. We will crop and resize later.
Open paper 2 copy and paste as a new layer onto your canvas. Go to layers down to load/save mask and find your mask and apply with my settings.

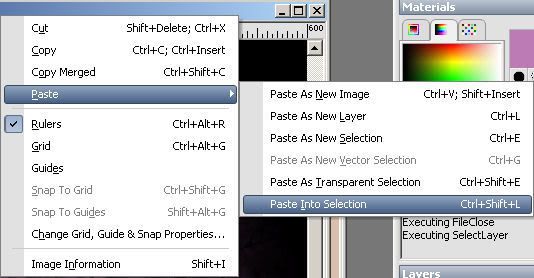
Merge group. Open the window that is in my supplies. Copy and paste as a new layer. Use your selection tube to draw a rectangle around your window panes. Add a new layer and flood with white (this is so your red mask doesn't show through your winter scene.) Move this layer below your window layer now find the winter scene mist you want to use and copy and paste it as a new layer. If your using the Rainbow coffi winter scene that I used then resize it 110% then go to selections invert and hit delete on your keyboard. Select none and then merge down your winter scene onto your white fill layer.
Open party bow2 from the kit resize the bow 50% then repeat the resize. Paste as a new layer on your tag and move up to the left top corner of your window. Sharpen the bow then duplicate it and go to image mirror it and place it on the top right corner of your window. Dropshadow your window and both the bows. Use my settings below.

Open Christmas tree with gifts. Resize 50% and paste as a new layer. Position the tree where you think it looks best. Dropshadow the tree with the same settings.
Open the tubes you want to use and resize if needed. Position them on your tag where you think they look best. Dropshadow your tubes.
Add any other embellishments that you would like and make sure to dropshadow.
Open the Christmas wordart and select the one you want to use resize 50% and then resize 80% two times. Sharpen and place at the top of your tag. Dropshadow your wordart.
Now click on your winter scene layer and highlight it. Go to effects and down to your plugins and find your xenofex 2 constellation. Use my settings below.

Resize your tag.
Now add your proper copyrights for you tubes and license number if needed.
Set your foreground color to black and your background color to pattern and find paper 4. Make sure you have paper 4 open and minimized on your workspace. I provided the font I used for my tag in the supplies so open it up or use another font. Type out your text convert to raster layer. Dropshadow your text.
Save your tag as a Jpeg and your done.
Hope you have enjoyed this tutorial.
Winterlicious Tutorial FTU
Winterlicious Tutorial FTU

I created this tutorial on November 15, 2008. If this tutorial resembles any other tutorial it's by accident this was created completely from my mind and knowledge of psp. It was created in PSP X but should work for any version.
Supplies you will need:
Tube of choice:
I'm using the beautiful artwork of Suzanne Woolcott. You must have a license to use her artwork. You can purchase one here. Do Not Use Unless You Have The Proper License To Do So!
Scrapkit of choice or the scrapkit I used called Winterlicious which you can download here.
Mask is called sg_braided star. You can download it from essexgirl. Go here then go to masks and it's under her masks page 26.
Font of choice.
Let's Begin
Open a new canvas 600x600 flood fill white. We will crop and resize later. Add a new raster layer go to selections and select all. Open paper 8 or your choice from the scrapkit. Paste the paper into selection. Select none. Go to layers and down to load/save mask and find your mask. Apply using my settings.

Merge mask group. Open frame 2 resize 80% smartsize. Copy and paste as a new layer on your top of your mask go to image free rotate and use my settings.

Grab your magic wand and click in the center of your frame go to selections, modify expand by 5. Open paper 4 or your choice. Paste as a new layer then go to selections invert and hit delete on your keyboard. Don't deselect, move your paper layer under frame. Now open the tube you want to use and paste as a new layer under your frame and resize if needed. Position your tube how you like and then hit delete on your keyboard. Now dropshadow your tube with my settings ( we will use the same settings throughout the tutorial).

Open the snowman from the kit and resize 50% smartsize place inside the frame and position how you want it make sure your snowman is under your tube also. Now dropshadow your snowman and your frame.
Open bow 3 or your choice resize 80% and paste as a new layer. Position at the bottom of your frame see my tag for reference. Dropshadow your bow.
Open the mittens from the kit resize 50% and paste as a new layer move to the top left side of your frame and dropshadow. Open button 2 or your choice from the kit and resize 50% and then repeat resize. Move up over the mitten strings and dropshadow.
Open flower 1 resize 50% then resize 80% place on the top right side of your frame see my tag for reference. Dropshadow your flower. Open flower 2 resize 50% then resize 80% 2 times. Place by the other flower and dropshadow.
Add your proper copyrights and license numbers.
Time for your text I used Wedding Invitation 2 font. Set your foreground to #75c6dc and your background to paper 9. Type out your text then convert to raster layer. Dropshadow.
That's it your done.
Hope you enjoyed this tutorial. Would love to see your results.
Thanksgiving Blessings Tutorial FTU
Thanksgiving Blessings Tut FTU

Thanksgiving Blessings this tutorial was created by me on November 13, 2008. If this tutorial resembles another tutorial its by accident. This tutorial was created from my own ideas and things I have learned using PSP. This tutorial was done in PSP X but should be able to be done in any version.
Supplies you will need:
Tube of choice I'm using the fantastic artwork of Scott Blair and you must have a license to use his artwork. Do Not Use The Same Tube Unless You Have The Proper License To Do So. You can purchase a license here.
Thanksgiving Blessings scrapkit which you can download at Trish's awesome blog dreamland designs here.
Missy's template 3 which you can download from her tutorial site Divine Intentionz under her links button. Here
My Supplies here.
Let's Begin
Open your template and hold down shift and D to duplicate your template. Delete the copyright layer. Close your original template. Click on your white background layer to highlight it. Then add a new raster layer, set your foreground color to #602d00 and flood fill your new raster layer. Open your mask that is in my supplies and minimize it on your workspace. Go to layers and new mask layer and use my settings below.

Delete your mask and click yes on the pop up window. Merge group. Duplicate your mask layer 2 times so you have a total of 3 mask layers. Close off your two duplicate mask layers and click on your original mask layer. Go to effects down to plugins and find your plugin Xenofex 2 Constellations and use my settings below.

Close off your original layer and open your next mask layer apply constellation to that layer but make sure to hit random seed once. Close off that layer and apply constellation to your 3rd mask layer but hit random seed one time on that layer also. Now go back to your original mask layer and choose your change to target brush and make sure your foreground color is still #602d00 and colorize your constellations with the target brush. Do this to all mask layers.
Now click on your circle layer and select all float, defloat, modify smooth both settings at 10. You should have your scrapkit open on your workspace. Find paper 2 and copy and paste it as a new layer onto your template. Go to selections and down to invert then hit delete on your keyboard. Now select none and delete your circle layer. Now dropshadow your circle with my settings below.

Now click on your frame layer select all float, defloat and flood fill with #602d00. Click on rectangle 3 and select all, float, defloat, modify smooth same settings as before. Paste paper 2 as a new layer selections invert hit delete on your keyboard. Delete your original rectangle layer and then dropshadow. Click on rectangle 1 selections select all, float, defloat, modify smooth same settings. Paste paper 2 selections invert delete on your keyboard. Delete your rectangle 1 original layer. Dropshadow your rectangle. Click on rectangle 2 selections select all, float, defloat, modify smooth. Copy and paste paper 4 as a new layer selections invert delete. Delete your original rectangle 2 layer and dropshadow.
Select your magic wand then click on your frame layer. Click in the center of your frame then selections modify expand and expand by 3. Paste paper 4 as a new layer selections invert delete. Select none, move your paper layer under your frame. Now find the tube you want to use. Copy and paste as a new layer resize if needed. Position your tube how you want it then erase the parts that hang below the bottom of the frame. Erase until it looks like the bottom of your tube is inside your frame and the top of your tube is coming out of the frame. Dropshadow your tube. Then dropshadow your frame.
Copy the turkey chain from the scrapkit and paste as a new layer, position on your rectangle and then use your selection tool to select the portions that are hanging over the rectangle and delete them. Do this to all 3 rectangles and position on the rectangles then dropshadow all 3 turkey chains.
Copy your indian girl safety pin ribbon from the scrapkit and paste as a new layer. Resize by 80% smartsize. Place in the lower left hand corner of your frame. Duplicate then go to image mirror and then flip. Position in the top right corner of the frame dropshadow both.
Add any other embelishments you would like. Don't forget to dropshadow them.
Now add your proper copyrights and license number.
Set your foreground color to black and your background color #602d00 stroke 1, text size 100 and type out your text. Convert to raster and then dropshadow.
Now to animate your tag.
Click on your original mask layer and make sure its open. Close off the other 2 mask layers. Copy merge and paste into animation shop. Back in psp close your first mask layer and open your second mask layer copy merge and paste after current frame in animation shop. Back in psp close your second mask layer and open your 3rd mask layer, copy merge and paste after current frame in animation shop. Resize your animation 85% and then save as a gif.
That's it your done. I hope you have enjoyed my tutorial.
Would love to see your results.
Snow Angel Tutorial FTU
Snow Angel

Snow Angel Tutorial
I created this tutorial on November 11, 2008
Areny resemblance to another tutorial is purely accidental.
Supplies you will need
I'm using the beautiful artwork of Suzanne Woolcott. You must own a license to use her work. If you would like to get a license please go here.
The scrapkit I'm using is called Snow fun. It can be downloaded from KittzKreationz blogspot. Here. She has some awesome stuff on her blog do check her out.
The mask I'm using is from essexgirl and you can find it here. It's on her Chritmas mask's page and its Sg_Christmas 7 mask.
Let's start.
Open a new canvas 600x600 and flood fill white. We can crop and resize later. Add a new raster layer then go to selections select all. Open paper 6 copy and paste into selection, select none. Go to layer down to masks and apply your mask using my settings.

Delete your mask and click yes on the pop up window. Now merge group. Resize your mask 95% and dropshadow with my settings.

Open the Christmas frame from the kit resize 80% and repeat the resize. Now grab your magic wand and click inside your frame. Go to selections and modify, expand by 5. Open paper 7 copy and paste it onto your canvas. Go to selections and invert then hit delete on your keyboard. Move your paper under your frame and select none.
Open the tube you want to use and paste as a new layer under the frame layer resize your tube until it fits inside your frame look at my tag for reference. Dropshadow your tube and your frame with the settings below.

On your frame repeat the dropshadow.
Open one of the dangle charms from the kit and resize 50% then resize 80%. Place on the right side of your frame. Duplicate your charm then go to image mirror. Dropshadow both charms.
Resize all layers 80%
Add your proper copyrights and license number if needed.
Now add your text I used Santa's Big Secret font. You can find it at dafont. If you use the same font I used font at 72 stroke 1.0. I then added a gradient glow your choice of settings. Dropshadow your text. Save as a jpeg.
That's it your done
I hope you have enjoyed my tutorial.
Friends Forever Tutorial FTU
Friends Forever

Friends Forever Tut
I used PSP X to create this tag but it should work with any version of psp. I used tubes from CCD Tube heaven. The butterflies I got from Rainbow Coffi at psp_playground. Filters you will need are Mura's Meister Cloud and Eye Candy 4000 gradient glow. My supplies are here.
I'm using the awesome artwork of Suzanne Woolcott. You must have a license to use her work you can purchase one here.
Please feel free to add any other elements or scrap pieces to your tag. Tutorials are just guides.
Let's Begin.
Place your mask in your psp mask folder. Open the rest of your supplies in psp and minimize for now.
Open a new image 600x600. Flood fill white. Add a new raster layer and flood fill with A0E5FC. Now go to Mura's Meisters Cloud.
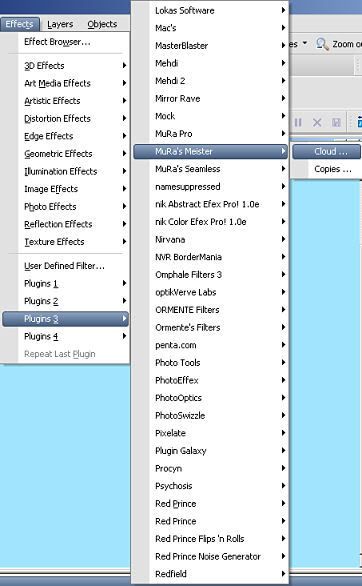
Use my settings in the screenshot below.

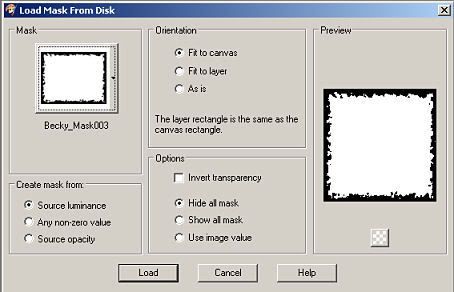
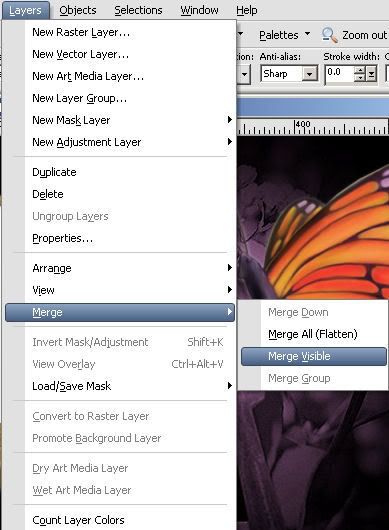
Now find the grass tube i supplied and copy and paste as a new layer on your tag. Use your mover tool to move it to the bottom of your tag. Now this is where your imagination comes in. Place the trees where you think they look good resize if needed. Place your swingset and bench where you would like them to be. Resize if needed. Once you have everything where you want them close off your white background layer (Click on the little eye in your layer pallette to close the white layer). Now go up to layers and then down to merge and merge visible the rest of your layers. Open your white background again. Make sure your merged layer is highlighted in your layer pallette. Go to layers and down to Load/Save Mask, Load mask from disk. Find your mask Becky_mask003 and use my settings.
Merge your group. Now find the tubes you would like to use and place them on your tag where you think they look best resize if needed. Add a dropshadow with these settings Vertical and Horizontal both at 2, Opacity set to 80, Blur 5.00 color black. Now find the butterflies you would like to use and resize them quite small and place on your tag. Add the same dropshadow to each butterfly.
Now time to add your text. Choose a font you like and two colors from your tag and set them as your foreground and background colors. I use stroke 2.0. size 72. Add your text and then convert to raster layer and add the same dropshadow. Add the proper copyrights and license number. Don't forget your watermark if you use one.
That is it you are done. I hope you have enjoyed this tutorial.
Teen Spirit Tutorial FTU
Teen Spirit

TEEN SPIRIT TAG
I'm using the Awesome artwork of CEI. You must have a license to use this artwork. You can purchase a license HERE.
Check out more awesome artwork here.
Supplies
Tube of choice
Scrap kit I'm using TeenSpirit by Yvette from Misfits Scrapz you can download it HERE.
Font of choice. I'm using Teen Spirit
Filters
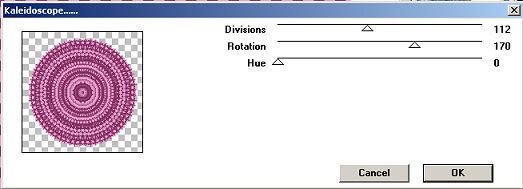
VM Distortion Kaleidscope
DBS Flux Bright Noise
Lets Begin
Open a new canvas 600x600 transparent. Flood fill white. Open paper 2 from the scrap kit. Resize 80%. Copy and paste as a new layer. Go to Effect down to your Plugins and find VM Distortion. Use Kaleidscope. See screenshot for settings.
Now we are going to dropshadow the circle we just made. See both screen shots for dropshadow settings.
Repeat dropshadow with the settings in screenshot below.
Open pocket 2 and resize 80% repeat resize. Copy and paste as a new layer. Now rotate your pocket with these settings.
Dropshadow your pocket. Open Flower 3 resize 50%. Copy and paste as a new layer and place it so it looks like it's poking out of the pocket. Open Flower 4 resize 50%. Copy and paste as a new layer and place beside your flower 3. Dropshadow both flowers.
Open butterfly 1 resize 50%. Paste as a new layer and place where you like. Dropshadow.
Open Heart 1 resize 50%. Copy and paste as a new layer. Place at the bottom of the pocket see my tag for example. Dropshadow. Open heart 2 resize 50%. Copy and paste as a new layer. Place beside your other heart. Dropshadow. Open your music notes and resize both of them 50%. Copy and paste as new layers and place where you like them. Dropshadow. Close all your layers except for your music notes and your two heart layers. Go to Layers Merge and Merge visible. Duplicate your merged layer two times. So you have 3 layers. Now click on your original merged layer. Go to Effects DBS Flux bright noise. Use my settings.
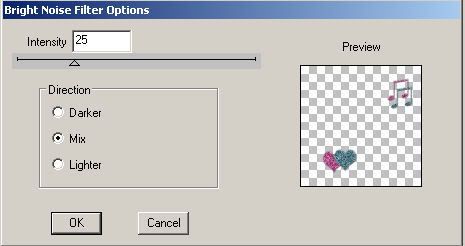
Close off this layer and click on your next layer. Apply bright noise but click on mix two times. Close this layer. Now click on your third layer and apply bright noise but click mix three times.
Open the tube you want to use and copy paste as a new layer resize your tube if it's too big. Place where you like. Dropshadow.
Set your foreground color on black. Set your background color on #842E60. Find your font. Size 72 stroke width 1.0. Type out your text and convert to raster layer. Place where you think it looks good. Dropshadow. Add your proper copyrights and your watermark.
Time to Animate
Make sure your two copies of your merged layer are closed off. Then copy merge your tag and paste as a new animation in animation shop. Back in psp close of your original merged layer and open the second one. Copy merge your tag. Back in animation paste after current frame. Back in psp close your second layer of your merged layer and open the third layer. Copy merge your tag. Paste after current frame in animation shop. Resize your tag 80%. Click on view animation if happy with your tag save as a gif.
I hope you have enjoyed this tutorial.
Denim Blues Tutorial FTU
Denim Blues

Denim Blues Tag
I'm using the awesome artwork of Keith Garvey. You must purchase a license to use his artwork. You can purchase one HERE.
Check out more of his awesome artwork here.
Supplies
Tube of Choice
Scrapkit Funky Denim can be found at misfits scrapz HERE.
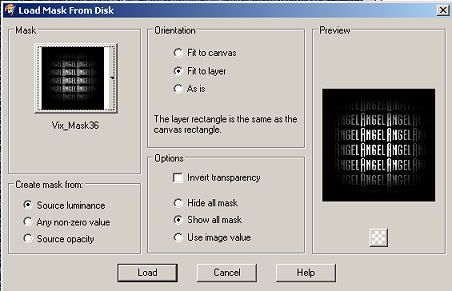
Mask Vix_Mask36 Here Then go to goodies to find her masks.
Font Blue Jeans 5
Lets Begin
Open a new canvas 600X600 transparent. Flood fill white. Open Paper 1 from the scrapkit. Copy and paste as a new layer. Go to Layers Load/Save Mask Mask from disk. Find your mask Vix_Mask36. Use the settings in the screenshot.
Delete your mask and click yes when prompted. Merge group. Now duplicate your mask and merge down. Open frame 1 copy and paste as a new layer. Go to your selection tool and set it on circle. Now draw out a circle that is just a little bit bigger than the middle of your frame. Go to Selections down to Edit Selection. See screenshot.
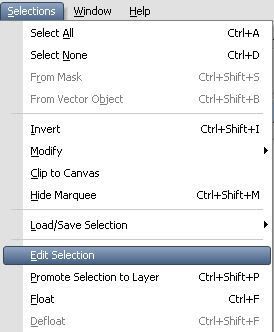
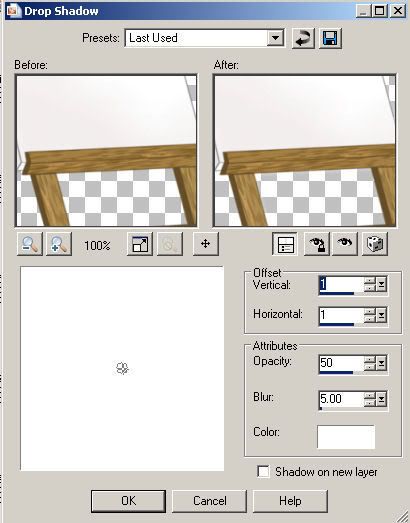
Your selection should now be a solid red circle.Use your deform tool to position your selection over the middle of the frame. Make sure your selection overlaps the frame a little bit. Go back to selections edit selections and click. You should now have marching ants again. Open paper 4 copy and paste as a new layer. Go to selections down to invert and then hit delete on your keyboard. DO NOT DESELECT. Move paper 4 under your frame. Now open the tube your going to use and paste it as a new layer. Position it in the frame when your happy with it's placement hit delete on your keyboard again. Deselect. Dropshadow your tube. See screenshot.
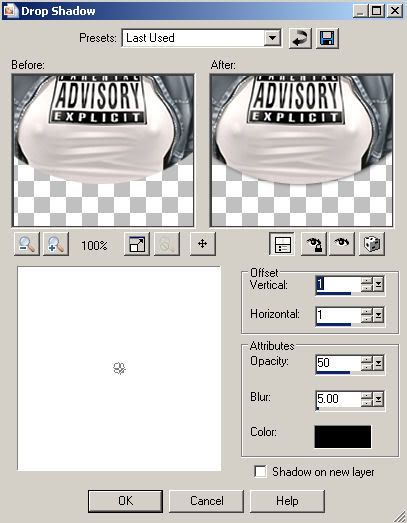
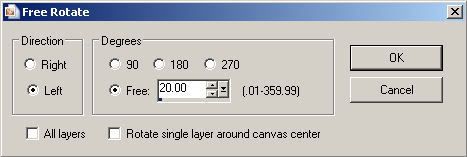
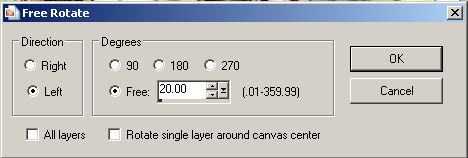
Now dropshadow your frame same settings. Open the pocket and resize it by 80%. Copy and paste as a new layer and place it on the bottom left of your tag. Go to Image Free Rotate and Rotate your pocket 20 degrees left. Dropshadow your pocket. Open the flower shape and resize 80% copy and paste as a new layer. Position the flower so it looks like its sticking out of the pocket. Now open the Heart shape resize 80% and position next to the flower. Dropshadow both.
Open the beads and copy and paste as a new layer. Resize them until they fit on the pocket. Use deform tool to turn them just a little see my tag for example. Dropshadow. Now duplicate the beads and move them down just a little.
Open the safety pin and resize it. Copy and paste it as a new layer place it on the right side of the frame. Dropshadow. Now use your eraser tool to erase a small part of the safety pin to make it look like it's sticking through the frame. See my tag for example.
This is what you should have so far.
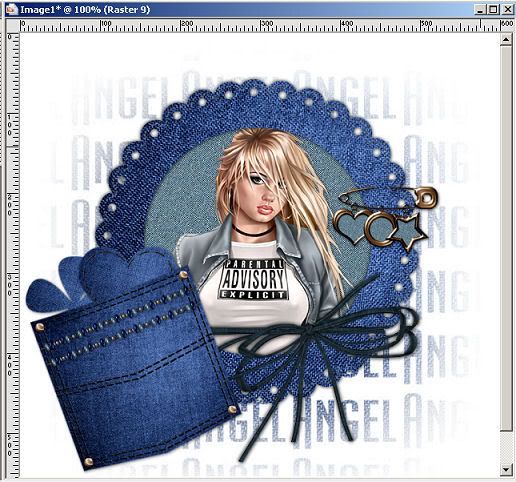
On your material pallet set your background color to pattern and find paper 1 use that as your pattern. Set your foreground color to black. Go to your text tool with these settings. Stroke width 2.0, Size 72 Font Blue Jeans 5. Type out your text and place where you like. Convert your text to raster layer. Dropshadow. Add your proper copyrights and your watermark. Resize your tag and save as a JPEG.
I hope you have enjoyed this tutorial.
Naughty Froggies Tutorial FTU
Naughty Froggies

Naughty Froggies Tag
This tag was created for a dear friend of mine named Kathy. She's a frog nut loves them.
The Artwork I used in this tutorial is from the awesome artist Elias Chatzoudis you have to own a license to use his artwork. You can purchase one Here.
Check out more of his awesome artwork here.
Supplies:
Scrapkit “PollyNLily” scrapkit by Swheat Creations
Download HERE.
Tube of choice
Font of Choice
Filters
Xero - Porcelian
Eye Candy 400 - Gradient Glow
Lets Begin
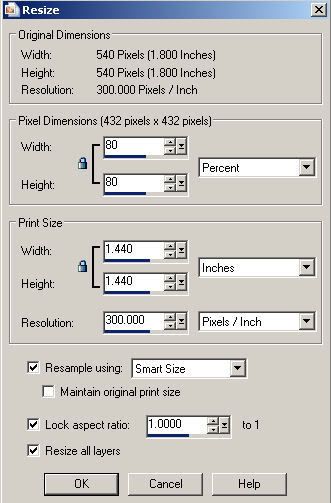
Open a new 600X600 transparent canvas. Flood fill with white. Open Coral plaid bkg. Resize see screenshot.
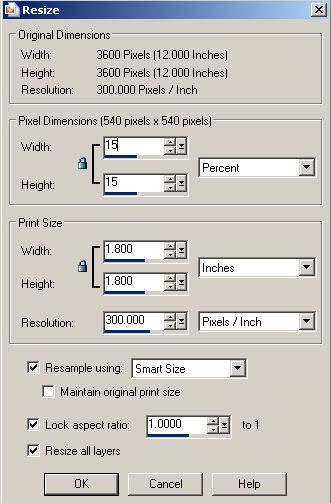
Resize again with screen shot settings.
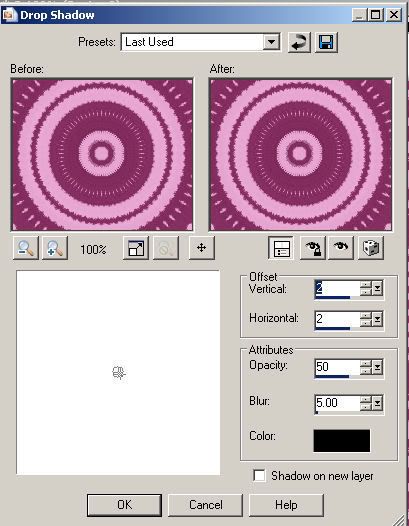
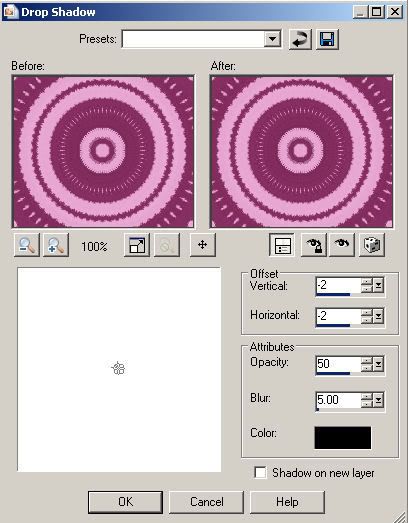
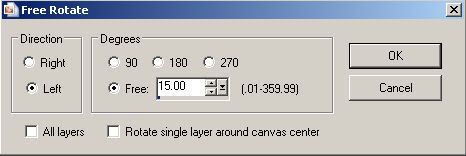
Copy and paste your paper as a new layer. Dropshadow with these settings Vertical & Horizontal 2, Opacity 50, Blur 5.00, color black. Now dropshadow again but change your Vertical & Horizontal to -2. Now go to Image, Free Rotate and rotate with screenshot settings.
Open Green Plaid bkg. Resize same as you did for your previous paper. Copy and paste as a new layer. Apply the same dropshadows to this paper. Do not rotate this paper. Open Frog Coral Plaid bkg. Resize same as before. Copy and paste as a new layer. Dropshadow this paper. Go to Image Free Rotate and rotate same settings EXCEPT change direction to Right.
Open Green Plaid Frame resize 80%. Resize again same settings. Paste as a new layer. Dropshadow. Click on your magic wand tool. Click in the middle of your frame. Selections, Modify, Expand and expand 5. Open Polly bkg 4 Copy and paste as a new layer. Go to selections down to invert. Hit delete on your keyboard. DO NOT DESELECT. Open the tube your going to use. Copy and paste it as a new layer. Resize your tube if it needs it. Position inside your frame once happy with the placement hit delete on your keyboard. Move both your paper and tube layers below the frame. Dropshadow your tube. Open your Lily and resize it really small. Copy and paste as a new layer. Position it inside your frame. Dropshadow your lily. Then duplicate your lily and move it over a little. Close off all your layers except for your frame, both lily's, tube and paper 4. Go to layers, merge, and merge visible these layers. Use your deform tool to turn your frame to an angle you like. See my tag for example. Dropshadow your frame layer. Go to Effects down to Plugins and find your Xero plugin. Find Porcelain and use the default settings.
Open Coral Bow resize 50%. Copy and paste as a new layer move to the top left corner of frame. Dropshadow. Open LilyPad resize 50% 2 times. Copy and paste as a new layer and place on top of right side of frame. Dropshadow. Open LilyPadPad. Resize 15% then resize 50%. Copy and paste as a new layer. Place at bottom left frame corner. Dropshadow. Open PollyWog Resize 50% 2 times. Copy and paste as a new layer. Position on top of the lilypad. Dropshadow.
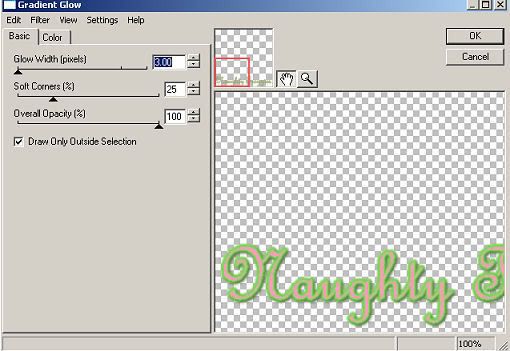
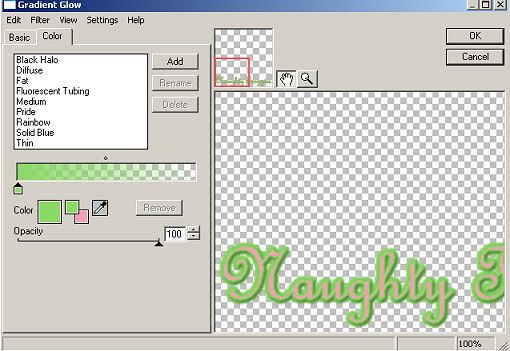
Open Green button resize 50% 2 times. Copy and paste as a new layer and position in bottom right corner of frame. Dropshadow. Open Dk Pink Heart button resize 50% 2 times. Copy and paste as new layer and position by the green button. Dropshadow. Now time to add your text. Set your Stroke color to #8AD965, Fill color to #FD9EB6. Stroke width 1, size 72. Apply your text. Now go to effect plugins and find eye candy 4000 gradient glow. Use my settings in the screenshots.
Add your correct copyrights and your watermark. Resize and save as a JPEG.
I hope you have enjoyed this tutorial.
I Love My Mom Tutorial PTU
I Love My Mom

I LOVE MY MOM
I created this tutorial on May 5th, 2008. If this tutorial has a resemblance to another tutorial is coincidental.
Supplies:
Happy_Mothers_Day Scrapkit which is the beautiful work of CSD Tutorials & Scraps you can purchase it here.
Or use a scrapkit of your choice.
Tube of choice.
I'm using The beautiful artwork of Jennifer Janesko. You must have a license to use her artwork you can purchase one here.
Check out more of her awesome artwork here.
Font of choice.
Lets Begin.
Open a new canvas 600X600 transparent. Flood fill white. Open paper 9 and resize 80% smartsize. Repeat the resize. Copy paper and paste on working canvas. Dropshadow your paper. See screenshot for settings.
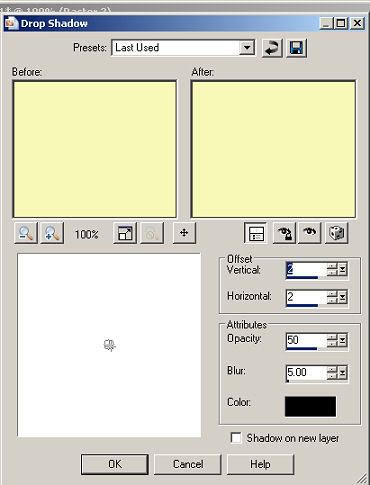
Repeat dropshadow same settings EXCEPT change Vertical and Horizontal offset to -2. Go to Effects down to your Plugins and find your Filters Unlimited 2.0. See screenshot for settings.
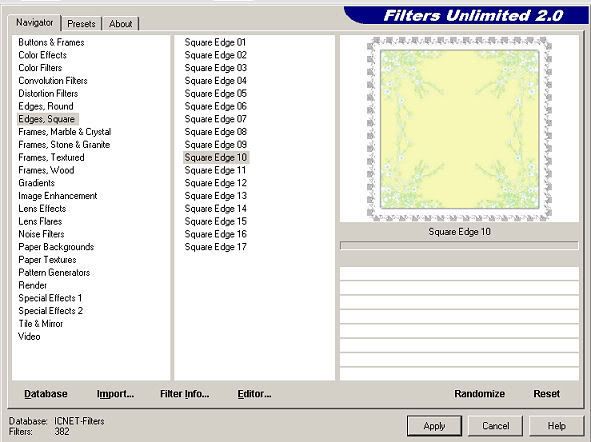
Click on apply. This gives it a lace looking border. Dropshadow with same settings as before V& H 2 and then again with -2. Open frame 1. Copy and paste as a new layer. resize by 80% smartsize. Click on your magic wand tool with your settings at Add, RGB Value, Tolerance 20, Feather 0, Anti alias checked. Now click in the middle of two of the frames I chose the top right frame and the bottom left frame. Go to Selections, down to Modify, click on Expand and expand by 3. Open paper 6, copy and paste as a new layer. Go to selections down to Invert. Make sure your paper 6 layer is highlighted in your layer pallet and then hit delete on your keyboard. Go to Selections, Select none. Move this layer below your frame layer in the layer pallet. Now click on your frame layer and make it the active layer. Click in the middle of the remaining two frames with your magic wand. Go to Selections down to Modify and expand by 3. Open paper 5 copy and paste as a new layer on your working canvas. Make sure your on paper 5 layer in your layer pallet then go to Selections Invert. Hit delete on your keyboard. Go to selections Select none. Move this layer below your frame layer.
Now we are going to add your tubes. Take your magic wand and click inside one of the frames. Expand by 3. Copy and paste your tube as a new layer. Resize your tube if it's to big. Position your tube inside the frame the way you want it when happy with placement selections invert. Hit delete on your keyboard. Move below your frame layer. Now add a dropshadow same settings before. Continue doing this until you have your tube in each frame. I also mirrored my tubes. Thats up to you.
Now hide your white background your paper 9 layer, and frame layer. Merge visible your tube layers and paper 6 & 5 layers. Unhide all your layers. Click on your frame layer to make it active and add a dropshadow. Repeat dropshadow with -2.
Open one of the doodles from the scrapkit. Copy and paste as a new layer, make sure it's just above your paper 9 layer. Dropshadow with same settings. Duplicate your doodle layer then go to Image, down to Mirror. See my tag for placement of your doodles.
You should now have this so far.
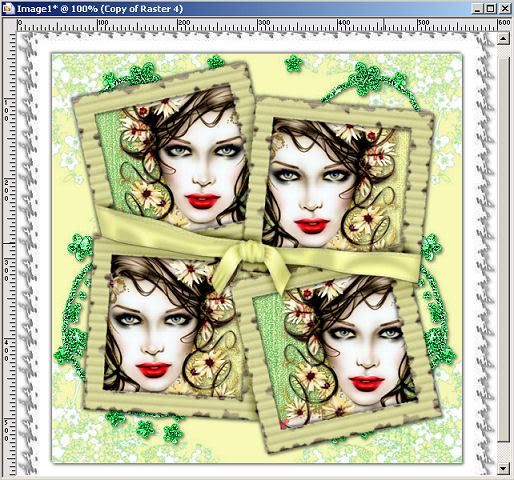
Open flower 6 and resize by 50% smartsize. Then resize 60% smartsize. Copy and Paste as a new layer. Position toward bottom left side of tag. See my tag for example. Dropshadow. Duplicate your flower layer and position like in my tag. Open flower 5 resize by 50% smartsize repeat resize. Copy and paste as a new layer and position like I have. Dropshadow.
Open one of the tags from the scrapkit. Resize 50% smartsize. Copy and paste as new layer and position it down by the flowers move this layer under the flower layers and make position the end of the tag just behind the flowers. Choose a bow from the scrapkit and open in PSP. You will want to use your Lasso tool set to point to point. Go around the bow you want. Then copy and paste as a new layer. Resize bow 50%. Go to Image Free Rotate and use my settings in the screenshot.
Dropshadow. Move your bow to the top left corner of frame see my tag for example. Duplicate your bow and move to bottom right corner of frame.
Open the butterflies. Choose the one you want to use and use the lasso tool. Copy and paste as new layer. Resize 50%. Position at top right corner of frame see my tag for example. Dropshadow.
Close off the the white background and paper 9 layers. Here is how your layers should look in your layer pallet.
Merge visible the rest of your layers. Resize your merged layer by 85%.
Time to add your text. Choose your font size 48-72 your perference. Stroke width 2.0. Set your foreground to #B0E0A5, and your background to #F7F8B6. Type out your text and convert to a raster layer. Dropshadow.
Add your correct copyrights and your watermark. Resize if you like. You are done.
I hope you have enjoyed this tutorial.
Freedom Tutorial FTU
Freedom

FREEDOM TAG
This tutorial was created on April 29, 2008. This is my own creation any resemblance to another tutorial is coincidental.
A very dear friend of mine by the screen name of Moonfire34 gave me the name for this tutorial. Love ya Moonfire.
The Images I'm using are © to Jeff Wilkie if you would like to own some of his work you can purchase them here.
Check out more of his awesome artwork here.
Supplies you will need:
PSP I used PSPX but you should be able to do this in earlier versions.
Animation shop.
7 Images by same artist.
Accent tubes
My Supplies HERE.
Let's Begin.
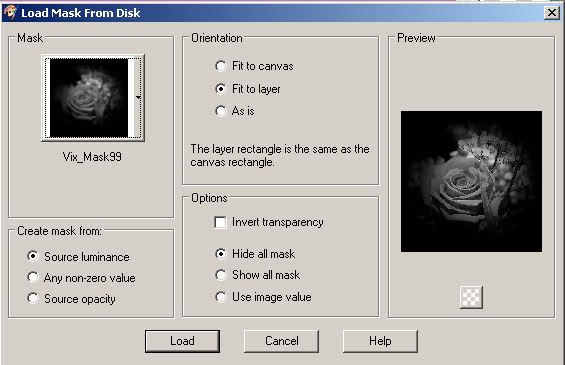
600X600 transparent canvas. Flood fill with black. Add a new raster layer. Flood fill with color #BC7BB4. Go to layers down to Save/Load mask, then load mask from disk. Find your mask Vix_Mask99. Use these settings.
Go to your layer pallet and right click on your mask layer then delete it. Click yes when prompted. Then merge group. Open your VArtEasel and resize by 80% smart size two times. Copy your easel and paste as a new layer and move to the left side of the tag. Add dropshadow with these settings.
Go to your magic wand with settings Tolerance 20, Feather 0, Anti Alias checked, outside. Click on white canvas. Go to Selections then down to Modify, Expand.
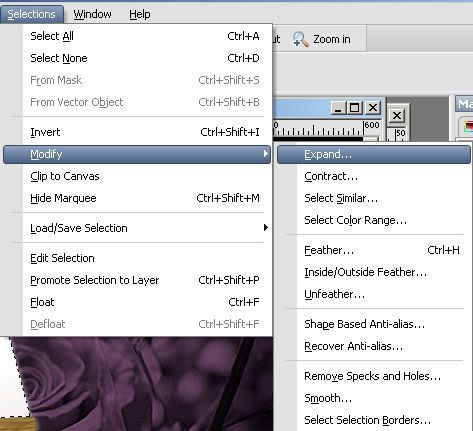
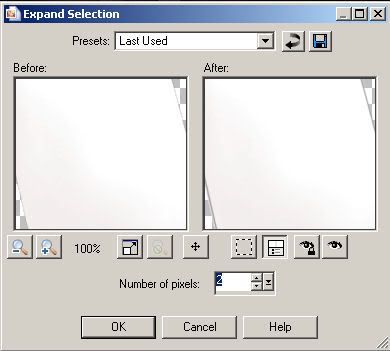
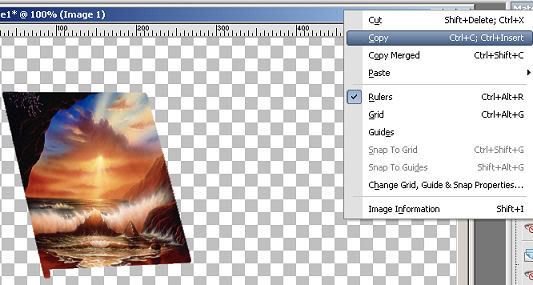
Expand by 2. Now open 7 images from the same artist. Copy 1st image. Add a new raster layer to your working canvas. Paste 1st image into selection. DO NOT DESELECT UNTIL WE ARE FINISHED WITH ALL 7 IMAGES.
Go to your layer pallet and right click on image one layer rename it Image 1. Then click on the little eye on Image 1 to turn off the visibility.
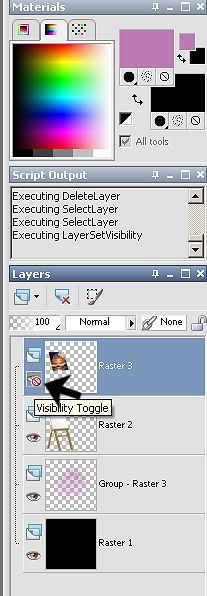
Add a new Raster layer. Choose another image. Copy and paste into selection. Rename this layer Image 2 and turn off the visibility. Add a new Raster layer. Choose another image, copy and paste into selection. Rename Image 3 and turn off the visibility of that layer. Add a new Raster layer. Choose another image. Copy and paste into selection. Rename Image 4 turn off visibility. Add new Raster layer. Choose another image copy and paste into selection. Rename Image 5 turn off visibility. Add a new Raster layer. Choose another image. Copy and paste into selection. Rename Image 6 and turn off the visibility. Add a new Raster layer. Choose your final image. Copy and paste into selection. Rename Image 7. Go to Selections down to select none. Add your butterfly or any accents you want to your tag. Choose a font or use mine. Set your size to 72, stroke width 2. Stroke color White. Fill color #BC7BB4. Type out your text and position where you think it looks best. Add correct copyrights and your watermark. Now make sure all your Image layers have the eye Xed out . Highlight your bottom layer which should be your black layer. Go to Layer, Merge, Merge Visible.
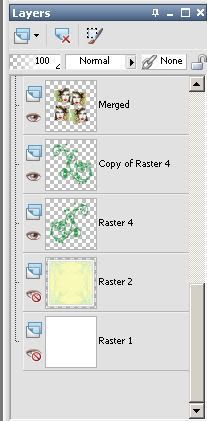
Starting at the top of your layer pallet it should be Image 7, Image 6, Image 5, Image 4, Image 3, Image 2, Image 1 and then your merged layer.
Time to Animate
Open animation shop. Back in PSP Click on the eye on Image 1. Copy Image 1.
Paste as a new animation in Animation shop. Back in PSP click on the eye on Image 1. Then Highlight Image 2 click on the eye to show image 2. Copy image 2 and go back to animation shop. Paste after current frame. Back to PSP. Close Image 2 and highlight Image 3 click on eye to open the visibility. Copy then back to animation shop and paste after current frame. Back in PSP turn off visibility of Image 3. Highlight Image 4 turn back on the visibility. Copy then in animation shop paste after current frame. Back in PSP repeat previous actions for Image 5, 6 & 7. Once you have pasted Image 7 after your current frame you should have 7 frames in animation shop. Click on your first frame in animation shop to highlight it. Then right click and copy. Then highlight frame 7 and paste image 1 after current frame. Go back to frame 1 and highlight it again. Go to effects, Insert Image Transition.
Use my settings here.
Click ok. Go to your next frame which should be frame 4. Highlight frame 4 then insert transition same settings. Next frame should be frame 7 highlight and insert transition. Next frame should be 9 highlight and insert transition. Go to next frame should be 10 highlight and insert transition. Go to next frame should be 13 highlight and insert transition. Go to next frame should be 16 highlight and insert transition. Go to next frame should be 19 highlight and insert transition. Go to next frame should be 22 highlight. Then right click on frame 22 and then delete it. You should now have 21 frames. Go back to frame 1 and highlight frame 1. Go to Edit down to Select All. Back to PSP. Click on the visibility of your merged layer and highlight that layer. Copy and paste as a new animation in animation shop. Now we need 20 more frames so hold down your CRTL, SHIFT keys at the same time. While holding those down press your L key on your keyboard. Keep doing this until you have 21 frames. Go back to frame 1 and highlight. Go to Edit down to Select All. Go to your first animation which is the image animation. Go to Edit copy. Then click on your main tag. Go to Edit, paste into selected frame.
Line your image up with the art canvas when happy with placement left click your mouse. Now go to Animation frame properties.
Set your frame properties with my settings.
Resize your animation by 80% smart size. View animation if happy save as a gif.
I hope you have enjoyed this tutorial.
Subscribe to:
Posts (Atom)

